The ball joint rubbers were split on three of the four ball joints at the ends of the tie rods. There was no sign of any deterioration of the ball joints themselves. That's good because the joints are expensive, hard to replace and affect the wheel alignment. That being said, the job was not easy.
The parts:
The ball joints 93802209 [ Now 500310933) (£48+)
The rubbers themselves Top 18mm Bottom 42mm height 30 mm
Ball joint nut M18 x 1.5 Nyloc (15504121)
Suspension arm nut M16 x 1.5 Nyloc (15504021)
Top joint:
Undo the ball joint nut. Use the jack to lift it up until the weight of the vehicle is pushing it out, then hit the housing hard, really hard with a hammer. it will pop out. However the ball joint can't be worked on without undoing the other end of the tie rod. The tie rod and ball joint can then be worked on on the bench.
Remove the damaged boot. Clean (mine were not dirty) pack in a bit of CV grease and put on the new boot. Reuse the old spiral circlip, the new boot came with a rather inadequate o-ring.
Bottom joint
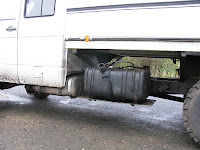
Same idea but more work. its not easy to apply pressure to the joint ( I borrowed a splitter tool that you tighten up). Access is hard. You need to remove the crossmember to get the tools and hammer in place. Once split, you still need to remove the sump guard to let the joint drop. and the other end of the suspension arm is held on with the shock absorber bolt. One of mine was impossible to move so I undid the lower wishbone pivot to allow enough movement for the ball joint ot drop. These joints I worked on in situ.
Tips and tricks
The main tip is to reuse the old retaining springs or be prepared to use special wire (A good item to have in a tool box). Actually once in place with limited movement and the joint compressed, the o-rings may be sufficient, but on the bench the boot just slipped off.
Popping the joint out really does need very hard hits on the housing with a hammer. Turn the wheel to give more room. No need to jack it up.
Six months later
MOT passed, so job well done
Already some deterioration of the rubbers, with microcracking. Not sure why. Some deterioration is age rather than use related. So perhaps its old stock. Or damaged by some solvents, but I only used normal oils. Overpacked with grease? I don't think so, but they are tightly compressed in place so not much grease needed.
Photos
 |
| New boot, with the old spiral circlip |
 |
| Hard work to get space at the lower joint |
 |
| Lower joint worked in situ |
 |
| Lower wishbone pivot removed to give more movement. I knew this joint was well greased. |
 |
| Work in progress at the campsite. |


Comments
Post a Comment