Posts

Showing posts from 2018

water leak new pump

Image
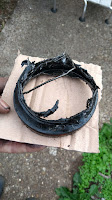
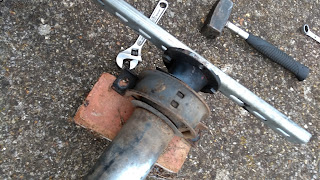
I clearly had a water leak, but with coolant catching the fan is was splattered all over and impossible to trace. I found it eventually by pressurising the header tank, thanks to a little hand pump that I had inherited from Rich. It was from the water pump. So new water pump: Parts: Pump 500361919 (Iveco £167+ ) o-ring 14472681 (discontinued)           94.62mm x 5.33mm white tube 4697947 (Iveco £2.64 +) o-rings on white tube x4 17278481 (Iveco £2.64+)           17.17mm x 1.78mm circlip on white tube x 2 11066976 (Iveco poa) Gasket for rear pipe 9843478 (about £1) New jubilee clips for water hoses  Antifreeze (Red 5ltr £9.99 eurocarparts) The pump included the studs but not the o-ring seal. The large o-ring is discontinued by Iveco. available on line ???? The white plastic tube becomes brittle, and as predicted, it broke during disassembly. Order of Work Front Grill off Radiator out Remove fanbelt and fan Removal and reassembly is difficult with the thermostat h

Just for the record Nov 2018

Preparations for the next trip November 2018 Oil and filter changed by the garage 2994057 Antifreeze changed (red, 5 year lifetime) New front brake pads 1906430 (1906040 is equiv)

Rear Diff Oil leak

Image
It seemed like a simple oil leak to fix, but I ended up finding four different places that the oil can leak out and fixed all of them. Flange to casing Oil was clearly leaking from the front of the rear diff casing and "wetting" the case. There is a major seal part number 40101693 (£26 Vexi). The job involves Undoing the rear propshaft flange to drop the end of the propshaft out of the way. Undoing the 36mm nut holding the flange adapter. Forum reports suggest this is very hard to remove, and then the seal comes out easily. I found the opposite. Nut is 36mm and should be torqued to 200Nm, mine came off easily. But the tab needs drilling or prizing out. The flange adapter then slides off exposing the splines The seal is a tight fit and needs to be prized off without  damaging the splines or thread. New seal goes in. It's a tight fit; must go in square and needs a soft mallett or piece of wood to put it in. Put the flange back and tighten the nut. You could bolt a

Front supension bushes

An MOT advisory. Forum friends have special tools, but the job was a easier than expected, with a bit of ingenuity. New bushes Iveco 1391347 (£26 from Vexi) or Bison parts 134-003 (2 for £15) what a price difference! I used the Bison parts, which had slightly thinner metal, but they generally use a variety of suppliers even for the same items. Tips: Use a puller of one sort or another. I found that M12 threaded bar and a variety of washers and socket sizes will do most of the job, But the last part needs a bar to straddle the whole bush Get the bolt out (mine moved easily) The inner sleeve is 29mm wide, so needs a deep 30mm+ socket or a piece of unistrut. And a smaller socket less than 29mm outside. Use the big washers to start moving the bush. For the last step you need a strong washer 50mm diam to pull it out. To reassemble You may want to chamfer the new bush to get it started well.

Propshaft bearing

Image
There was some play in the central propshaft bearing. Actually it was the rubber that had deteriorated rather than the metal bearing, but the solution was the same. Here are some tips: Mark all the components so that the shaft can be reassembled without accidentally being imbalanced. Some components are splined, so the marking needs to be precise.  36mm nut to remove 200Nm. I took the propshaft to a garage to remove it. A quick job with an impact driver air tool. Very hard to remove the old bearing using improvised tools. Apparently the professionals use an angle grinder to cut it off. Iveco and Vexi suppliers are not very helpful. There are a wide variety of propshaft and bearing sizes. I knew mine was not the original because the chassis had been extended.  Bison parts were excellent value with several standard sizes. Mine was ***** Off with the old one. Professionals use and ingle grinder! On with the new: In place just right

Ball joint covers

Image
The ball joint rubbers were split on three of the four ball joints at the ends of the tie rods. There was no sign of any deterioration of the ball joints themselves. That's good because the joints are expensive, hard to replace and affect the wheel alignment. That being said, the job was not easy. The parts:    The ball joints 93802209 [ Now 500310933) (£48+)     The rubbers themselves  Top 18mm Bottom 42mm height 30 mm    Ball joint nut M18 x 1.5 Nyloc (15504121)    Suspension arm nut M16 x 1.5 Nyloc (15504021) Top joint:  Undo the ball joint nut. Use the jack to lift it up until the weight of the vehicle is pushing it out, then hit the housing hard, really hard with a hammer. it will pop out. However the ball joint can't be worked on without undoing the other end of the tie rod. The tie rod and ball joint can then be worked on on the bench. Remove the damaged boot. Clean (mine were not dirty) pack in a bit of CV grease and put on the new boot. Reuse the old spiral

Diff Lock Springs

Image
One failed on the road, so I looked up and bought new repla cements. I was surprised to see that the active and return springs were different parts: Cable: 7167800 £3.97 Return: 716801 £2.14 All now replaced and a spare pair in the tool box.

On the road repairs

Here is just an odd list of the little jobs that needed doing on our big trip. Some have longer blogs to themselves: Solar controller changed to MPPT. I'd upgraded from 20Amp MPPT to 40 Amp because techncially my 280W solar panels can give out more than 20Amps. This was a mistake though. The old controller still worked in bright sun but just could not use all available power. My main problem was getting the most power out in poor light conditions - that's where MPPT wins. So I now have a bimble solar 40Amp MPPT controller (and a spare Steca 40A PWm controller - any offers?). Rear Step rebuilt in Tafraoute using local materials. Wood and Diabond as used by the many small workshops making windows. Exhaust brackets welded by a small workshop at the side of the road. Alternator failure. I'd had that before so I recognised the symptoms. Well I'd expected to buy a new alternator and wait a couple of weeks. Instead a small workshop in Safi disassembled it, did somre te