Posts

Showing posts from 2019

Cold Start system Thermostarter

Image
November 2020 Update See notes further down for the latest. The Iveco has a cold start system, or so I thought. But the pattern of flashing lights when I started was not the pre heater, but an error code. The cold start system was not connected. It is now. Our engines don't have glow plugs. Instead there is a single preheater that heats up some diesel fuel and squirts it into the air inlet. It works below zero. The unit does so diagnostic tests and flashes the pre heat light to show the outcome. Normally the light goes on for a couple of seconds and then off. The electronic manual on Ivecodaily4x4@groups.io posted by Hugo has an invaluable diagnostic guide. There is a module behind the fuse box that takes the signals in and send power to the preheater. In my case the main power cable was missing. Also the crucial temperature sensor was faulty. A new one solved the problem. No error codes now. Iveco Daily Genuine Iveco Coolant Temperature Sensor Part No.4857248 5010293265 £18 from V
Ivecodaily4x4@groups.io

We have a new forum. Yahoo inexplicably closed down all their groups. Unbelievable. For a small fee we did a transfer to groups.io. All in place and looking good. Many thanks to Hugo for leading us and many other users for contributing. https://groups.io/g/Ivecodaily4x4

Steering rack removal and refurbish part I

Image
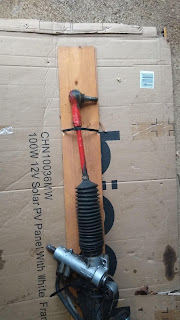
This was never really in the plan. Yes it did have a small fluid leak wetting the inside of the gaiters, and some discoloration of the steering fluid. But nothing serious. However the engine mount project required the rack to be dropped (the ball joints stayed in place.) So it seemed an opportune time to remove it and send for refurbishment. I used in Steering Specialists Wakefield   because they had done a good job with a picanto caliper, and they were really easy to communicate with. No regrets. Collection and return of the rack was so easy. I strapped it to a plank of wood and put it into a cardboard box. They removed all extra bits liek ball joints and returned them loose.  ACS in Walsall  have been used by other Iveco people and get good reports. I found it very difficult t install. I tried repeatedly with the steel ppes attached because they are so hard to reach once installed. But eventually i gave in and put the rack in first and used a short spaner to conect the pipes. New hyd

Reversing camera without LEDS

Image
Like many people I bought the reversing cameras off eBay in a unit with camera surrounded by infra red LEDS. The design is useless. At night the LEDs come on and completely white out the camera. Teh units work better without the lights, just elying on streetlights and car headlights for illumination. So I openned one up and disconnected the LEDs. So 90%  of the unit is wasted space !

Engine mounts

Image
This was a horrendous job. It started well with a new mount for the transfer box. It looked cracked and I'd carried a spare around for a couple of year. Easy job. Then the rear mount on the gearbox.Not too bad, just jacked the box up a bit. The old mount had completely separated the rubber from the steel and it had had dropped as far as the retaining bolts allowed. Then the main engine mounts. Some reports say you can just jack the engine up and prize them out. That seems hard to believe, but it must be true. Anyway the bolt on one had separated from the rubber and just spun round. So no choice but to drop the cross member. And then I could not get that out without dropping the steering rack. Having dropped the steering rack I sent it to be refurbished (it was dripping a bit and the oil was turning black. Parts for the engine mounts were expensive and hard to source. I used Vexi who got them from Europe. They are good price from China and readily available, if you are prepared to p

Crawlthrough - completed

The crawlthrough started rather nervously with separate holes being cut in the cab and camper.

ISRI seats part VI

Image
Yet more maintenance on the ISRI seats. its only a small thing, but quite irritating, unnecessarily so. The seat belt buckles were rather fiddly and did not always engage. Tw different solutions: Drives side a new ISRI part from Jennings Seats for about £40. Passenger side a generic buckle on a short strap. for £13.99 or less on eBay .This has the advantage of being easier to find (particularly if the passenger has a big bum).   And also for the drivers side a new cover £24.99 on eBay. Very pleased. The passenger wanted to keep a sheepskin. And seat belt grips to replace the clothes peg £4.69 off eBay of course:

2019 MOT and for the record

Two fails from the MOT front step sill badly corroded. And the rear LEDs lights still not as they should be: Front Passenger side step. This was an MOT fail. I'd had the drivers side done so back to the garage to weld the passenger side. Thanks to Southam Mini metro for a really solid job. No need to match sides or look original, just good and strong. They recommend M12 flange nuts for the captive nuts. Rear LED light cluster Another MOT failure, they are still not right. Note that the cluster has no voltage regulation, so it has to be bright with 12V or 14.4V and LED simply don't light with a low voltage. All OK now but required: A new earth connection block in the engine compartment. One new light cluster because of failed LEDs Modifying the cluster circuit board to remove a diode from the indicators. That eliminated the voltage drop and increased the brightness. Rear Shock Absorbers Replaced. These are very hard to test, but clear signs of fluid leaking fr

Torsion bar Bushes

Torsion bar bushes A challenging job to do. Homemade pullers are essential to remove the old bushes and press in the new ones. It's a splined shaft with a notch, so essential to line up the notch on the torsion bar spline and the swing arm. The notch lines up with the hole for the split pin and is at 90 degrees to the adjusting arm at the other end. Its necessary to remove the upper suspension arm and helpful to remove the lower bump stop. You need to remove the rear bracket holding the suspension bar. However there is a rivet in the way. So you also need to loosen the front part of the bracket to give the rear enough play. I made a puller with 12mm threaded bar vaious 1/2 inch drive sockets and a strong  mm washer. The thick metal disk on the end is useful to start the bushes moving. Parts front bush 60143420 Vexi £36.24 (Bison Parts BP109-083 £9.83) rear bush 60143421 Vexi £36.58 (Bispon Parts IVSP0056 £14.72 ) Castellated nut M156x1.5 (£6.95 on Ebay for a pair plus

Snorkel

Image
A snorkel - is it worth it. After years of searching for a snorkel, I finally agreed to buy an old one from Grahame. My other option was to adapt pone from a LandRover defender (Nigel had done that very well). It is not a snorkel First lesson is that it is not a snorkel. It is a raised air intake. The crucial difference is a snorkel is expected to be waterproof, but this design is open in the vehicle wing, which is not sealed, it has drain holes. So if left standing in very deep water, then the engine would suck in water not air. A raised air intake is supposed to be good for drawing in air with less sand and dust. But the key feature is that it looks cool. Fitting is Difficult It is a large plastic item, that stretches across two steel body panels. The fixings points don't line up well. It is prone to vibration and so the mounts need to be flexible. To keep water out it needs to be fitted tight and various holes sealed up. And the indicator light needs to fit

Rear Diff oil leak again

Rear Diff oil leak again With help from Leigh at the Overland show, the cause was diagnosed as slight play in a propshaft universal joint. Replaced the UJ, replaced the oil seal again and this time with a new flange and new nut (both cheap stock clearance items) Parts UJ 8197741 40x92mm Vexi £60 (stock clearance Ebay £18,95 ) Oil seal 40101693 Vexi £26.90 Flange 7166992 Vexi £99 (stock clearance Ebay £44.00 ) Nut7162213 Vexi stock clearance £3.00 All looking good so far.

On the road repairs

Image
November 2018 to April 2019 We are on the road in Morocco, we did not have any breakdowns, but did take opportunities to do preventative work and "nice to do"  repairs. In fact I'd taken some jobs with me. Camper brackets Glued and screwed to strengthen the camper where minor cracks were forming. Tyre swapped So easy to do with the military 3 part split rim Ball joint Rubbers I had replaced the rubbers with parts from ebay a year ago. They were already cracked. In fact micro cracks appeared within a month - absolute rubbish and an enormous waste of time. we got some new rubbers fitted at ExtraTec in Laayoune.  They provided rubbers by buying ball joints of a similar size and taking the rubber off for me. £200 for the whole job. it really was an independent garage in Morocco with a very high standard and english speaking staff.

Big Trip 2019

We set off again in December 2018. A quick dash to Agadir and then flying back to the UK for a short Christmas break. So we set off in the new year to explore the southern part of Morocco, including the Western Sahara region. The motorways are behind us, adventure ahead, what better way to start the new year. We now put our trips on PolarSteps :