Posts

Propshaft bearing

Image
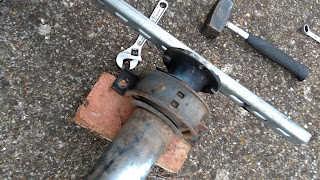
There was some play in the central propshaft bearing. Actually it was the rubber that had deteriorated rather than the metal bearing, but the solution was the same. Here are some tips: Mark all the components so that the shaft can be reassembled without accidentally being imbalanced. Some components are splined, so the marking needs to be precise.  36mm nut to remove 200Nm. I took the propshaft to a garage to remove it. A quick job with an impact driver air tool. Very hard to remove the old bearing using improvised tools. Apparently the professionals use an angle grinder to cut it off. Iveco and Vexi suppliers are not very helpful. There are a wide variety of propshaft and bearing sizes. I knew mine was not the original because the chassis had been extended.  Bison parts were excellent value with several standard sizes. Mine was ***** Off with the old one. Professionals use and ingle grinder! On with the new: In place just right

Ball joint covers

Image
The ball joint rubbers were split on three of the four ball joints at the ends of the tie rods. There was no sign of any deterioration of the ball joints themselves. That's good because the joints are expensive, hard to replace and affect the wheel alignment. That being said, the job was not easy. The parts:    The ball joints 93802209 [ Now 500310933) (£48+)     The rubbers themselves  Top 18mm Bottom 42mm height 30 mm    Ball joint nut M18 x 1.5 Nyloc (15504121)    Suspension arm nut M16 x 1.5 Nyloc (15504021) Top joint:  Undo the ball joint nut. Use the jack to lift it up until the weight of the vehicle is pushing it out, then hit the housing hard, really hard with a hammer. it will pop out. However the ball joint can't be worked on without undoing the other end of the tie rod. The tie rod and ball joint can then be worked on on the bench. Remove the damaged boot. Clean (mine were not dirty) pack in a bit of CV grease and ...

Diff Lock Springs

Image
One failed on the road, so I looked up and bought new repla cements. I was surprised to see that the active and return springs were different parts: Cable: 7167800 £3.97 Return: 716801 £2.14 All now replaced and a spare pair in the tool box.

On the road repairs

Here is just an odd list of the little jobs that needed doing on our big trip. Some have longer blogs to themselves: Solar controller changed to MPPT. I'd upgraded from 20Amp MPPT to 40 Amp because techncially my 280W solar panels can give out more than 20Amps. This was a mistake though. The old controller still worked in bright sun but just could not use all available power. My main problem was getting the most power out in poor light conditions - that's where MPPT wins. So I now have a bimble solar 40Amp MPPT controller (and a spare Steca 40A PWm controller - any offers?). Rear Step rebuilt in Tafraoute using local materials. Wood and Diabond as used by the many small workshops making windows. Exhaust brackets welded by a small workshop at the side of the road. Alternator failure. I'd had that before so I recognised the symptoms. Well I'd expected to buy a new alternator and wait a couple of weeks. Instead a small workshop in Safi disassembled it, did somre te...

How big is your gas locker?

Image
I usually carry a 7kg ref propane cylinder for cooking and water heating. When it's running low I can squeeze a second one in the locker. So, travelling to Spain, where the bottles are incompatible, I decided to take one larger bottle. If it lasts until Morocco then I can discard the British bottle and swap to local ones with a local regulator. The bigger bottle was a tight fit, a very tight fit. No, actually it was too big. At 320mm in a locker 300mm deep. Why was it that size? and what would I do. Well it almost fitted by bending the thin metal lining of the locker. Only the wooden frame stopped bending enough. So I cut away some of the frame an refitted the lining. Job Done. And why? Well it's an American designed and built camper ..... so no reason at why our bottles would fit. Luckily I bought the bottle a few days before we set off, while I still had access toy tools.

Data on the move

How to access our data files and photos on the move? We can't rely on fast internet access everywhere we travel. But all our files including photos amounts to over 100GB We do have key files on Microsoft OneDrive. But the main storage is external hard drives. 1) to use 2) a backup hidden in the TARDIS 3) A back up in the UK that will get slowly out of date. I've finally worked out how to access them from smartphones as follows: A) an OTG On The Go cable to plug into the smartphone. B) A Y cable USB 3.0 DUAL POWER Y CABLE LEAD 2 x TYPE A Male TO 1 x TYPE A Female C) An app "es filer explorer" The Y cable provides owner to the external hard drive while allowing a data connection to the smartphone via the OTG cable. However the android phone can't read the file system on the HD so that's where the es explorer app comes in. It's quite a good app apart from the adverts. An alternative is to use the Toshiba stor.e wireless device. Which I also bough...

PIC data

Just for the record: the TARDIS is a mix of base vehicles. In the parts catalogue they can be found from the PIC code, as follows: 13214124 original vehicle A2CD13BA  VIP = A2CD13BA D50005 Air suspension 13034424 2800 engine A4DBA6BA Clutch on 6.5t 14911111 Snorkel and accelerator and cab mounts