Posts

For the record 2024/5

Well this was a lazy couple of years.  2024 A trip to the lake District,  replacing the three point chassis mount with a more conventional spring system. That took most of summer 2024 to sort out. 2025 Paint job on the cab, very nicely done by a small local paint shop Oil change December. Very eventful because the oil filter was too tight ( not me) See oil filter problems. Spare wheel moved to passenger side for better balance.

For the record 2023

 Travelling through Italy. After 6 months storage, the starter notor jammed, but it was quickly relaesed with a hammer blow and never caused a problem since. A small leak in the roof was mainly collected in the drip bowl without causing damage, September 147879 miles: Oil change in Matera oil filter and 3 fuel filters changed November:  The chassis mount was repaired by a mobile welder. Very pleased at that. Front tyres are wearing on the outside. I raised the front suspension by 3/2 turns and the suspension is now midway between the bumb stops. Rear tyre swapped with the unused spare wheel.

MOT 2022 for the record

 September 2022 MOT passed first time. LHS engine earth point repaired (that fixed a horn and indicator problem)  Brakes bled ok (confirmed by cross roads garage), but the brake pedal was still spongy. I manually adjusted the rear drums and that solved the problem.  June Oil change,  June camper dude damage repaired. 

Morocco Fast and Slow

Image
 A talk about our Moroccan trips given to Globetrotters 6 Feb 2021 Available on You Tube It is based on Polarsteps logs 2019 was a live log, the others are added in a rudimentary way afterwards.

Battery problem

On a cold night camping my morning plan failed. I was going to jump out of bed switch on the  Eberspaecher heater and hide under the duvet until it wormed up. But the battery was flat, or at least too flat to provide the high current required at start up. To cut a long story short, the panels at 100W each could only give 5W in the winter. Not enough to boost the batteries up. They need 14.4 V for a couple of hours a day. So now I've regularly got the charger out to top it up.  Charger is a very nice Victron IP67 Bluesmart charge. With bluetooth monitoring and 25A power rating.

Steering rack part II

Image
Once the engine oil leak had been cleared up, it became apparent that there was, and always had been a steering rack fluid leak. Just weeping a bit from the bottom. Indeed one purpose of fixing the engine oil leak was because it could be masking other problems. The rack had been refurbished (see blog)  twelve months ago and was still under warranty. And at some point the hydraulic inlet thread was badly damaged. The steering specialists said to send it back. The could not repair it so they sourced another one for an extra hundred pounds and sent both racks back to me. To be sure of good joints I went to Pirtek in Milton Keynes to have some more metal pipes made (from the hoses to the rack. Plus new unions and special hydraulic washers that should be better than the old copper ones. This time I knew they took off the ball joints, so I did that myself and counted the threads - to replace them myself for a good approximation for the tracking. Once completed the steering wheel needed...

PTO Oil leak

Image
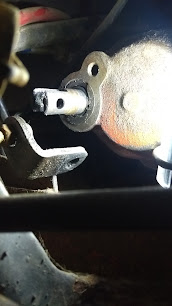
 An ititating oil leak from the PTO where the selector shaft enters. I was considering removing a striping the PTO to fix the leak. Or even finding a new PTO. I was told parts were not available for refurbishing them. but Chris Super Cooper Mobile mechanic . Suggesting looking to see if the seal fitted from outside. This seemed implausible. but with an inspection light and camera it was indeed the case. The old one came out easily and once out it was clearly metric 16mm shaft 28mm diameter seal, 7mm thick. The amazing simply bearings had two seals to match 16x28x7_SC (R21/SC) and an _TC (R23/TC) at just £2.39 each. The difference was that one had a lip for a dust seal. So I fitted that, even though the one that came off did not  have the extra lip. Job done, no leak. Let me say again how good Simply bearings are. They have a vast catalogue, which is very easy to look up seals by dimension - metric and Imperial. And delivery is fast.

Windscreen Gutter

Image
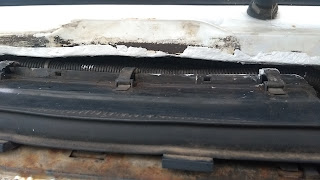
 The gutter beneath the windscreen was leaky. Again, this showed up after the oil leak was fixed and I saw a wet patch under the engine. Well, wet it was - water. The problem does not show up well in the photos. After a couple of attempts this was the fix: 1) Throw away old rubber seal. 2) Clean as much rust as possible from the gutter, leaving several obvious holes. 3) Prime the metalwork with good quality primer (Rustoleum grey anti-rust primer) 4) Glue on some pieces of aluminium angle 15 x 15 x 1.5mm Using copious amounts of still all glue. One failed attempt had a lot of glue, but still not enough. 2 x 1m for £7.20 from EBay Metals shop 5) A couple of coats of rustoleum white 6) A new rubber from seals direct . 20mm bulb to fit panel 2.5mm to 5mm £21.35 incl. Vat and delivery Old gutter de-rusted and primed.

Bumper

Image
 The old bumper was always rusty and bits rusted away even. Despite layers of rustoleum on the outside, they never stopped the rust eating away from the eds and insides. But not large sections have dropped off. Time to do something. ... and that's the good side. It was a strange story. After months of research I'd narrowed it down to two options that were both going to cost me about £1000. Import a new one from China or get the old one rebuilt in the UK. I'd identified T and G Promech as a company in Poole willing to take to on and T&J tubes who would bend up sections of the 60mm diameter tube. There are only a few companies witht he capability to put custom bends in 60mm tube - and most of those are not interested in a small job. Technically it is called rolling rather than bending and uses different tooling compared with putting in a fixed radius bend. The day before I set of to Poole, with a wallet,  got a call to say that someone was selling a reasonably good bum...

Lock down challenges

Having been parked up for a year now, a long list of jobs has gradually been completed. Engine mounts was the hardest. New Bose speakers from an Audi, was the most satisfying.  Just for the record here is the long list to June 2020: ........

Heater controls replaced

Image
Who designed these heater controls? I could never imagine anything so complicated. But it has to combine three control wires and switches. Mine had no control for windscreen vs. feet, and the fan worked intermittently. I was ready to put a new, separate,  control wire in the dashboard. But the a genuine Iveco one came up on eBay What a bargain at £25.99 And what a horrendous job to fit .

Interior Lights

Image
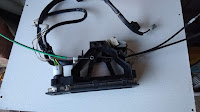
Not having interior lights was a "feature" It meant the battery could not go flat ! However times change, the roof panel was undone to fix the LED bar, and I had a ex Iveco light unit to use. Some things to consider It is wired to the vehicle side lights so that it could not be left on just by having the door open. LED lights to reduce current flow, increase life of bulb and more reliability because the bulbs are soldered in. £4.95 for a pair of BA9 bulbs (I only use one) and £4.98 for a whole set of panel lights. The LED bulbs have a polarity. Now filament bulbs can be wired either way. Usually the case is negative and the nobble is positive. But the interior light cluster is designed to be switched by the earth so the polarity is wrong. I needed to rewire it.

BMW New compressor

Image
That worked out well. I bought a compressor off eBay for £30 from a BMW E53 X5 with air suspension. I'd wondered if it would perform better than my tired old one and be cheaper than even a refurb kit would be. It's great.Waterproof too, with a 10mm pipe for air intake. Quickly got up to my normal 4 bar pressure.and now adjusted up to 8 bar, so that should be good for the pneumatic seats if I ever get to work on them. I fitted an air filter: RangeRover P38 (£5.99 from Ebay) on the end of the inlet pipe.Which sits about 300mm above the chassis rails.

LED Light Bar

Image
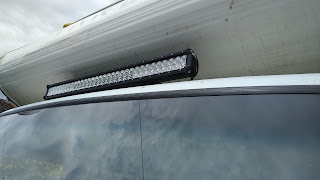
Wow that's bright. It is actually very hard to chose ad LED light bar. The adverts exaggerate the power and the brightness figures are usually missing. On the bright side ha  ha ... the reviews are always pleased with how bright they are. It was tempting to get one the full width of the roof, but for me the unflated power levels were a turn off. A high current draw is bad for me and severely limits how much I could use on without the engine running. So I bought a 30" 198W bar from Wow LED on Ebay. I did not wnat curved ones and preferred post mounted rather than end mounted. Wiing is not trivial. It needs a relay and a cable from the battery feed at 30Amp (actually even a 10 Amp fuse was fine - so much for 198 Watts). Wires to the roof, but a switch inside. Not rocket science, and eventually completed. I went for mounting on the cab roof. I had considered the bumper. Low is supposed to be better for snow and bad weather, but mounting on the bumper would make it more vulnerable...

Cab HiFi

Image
A very satisfying project. How to improve the music in the cab. With a cheap ldi radio and tinny mismatched speakers things coudl only get better. The Radio I used to have cheap radios, like you get from Aldi or Lidl for £20 to £30. With the front cover broken I searched for a new one and was persuaded to up my budget to about £100. Excellent advice. Still a mean old git I bought a refurbished unit from used car stereo on eBay.   SONY MEX-N7300BD / DAB+ / FLAC / Bluetooth / USB / AUX / microphone for  £89  Great buy, and a good company to deal with (I bought another one from them for the camper). Good points: The sound is great 55W per channel. I definitely need more than 30W in the noisey truck. DAB radio that's a nice to have. Microphone for hands free phone calls - I had not appreciated how good that would be. Can load the CD without moving the fascia (that removes one frequent failure mode) Takes input from high quality bluetooth codecs and Android mode. U...

RPM sender

I had a very erratic rev counter, particularly at low revs. On investigation the  wires were frayed coming out from the sensor. It was irreparable. Very easy to see the fault. I bought one off ebay with a good part number that looked the same.  It’s on the passenger side, RHS as you look from the front. On mine the wire damage was obvious and too close to the sensor to fix. My first fitting gave no signal and then I screwed it in one turn and it was OK. Adjustment  needs care because it needs to be screwed in close to the flywheel without hitting it. IVECO 4861291    The first one up on eBay is £43 and looks like mine.  Bear in mind that my engine is a 2.8ltr and my clutch housing and clutch is from a 6.5 t  

Cold Start system Thermostarter

Image
November 2020 Update See notes further down for the latest. The Iveco has a cold start system, or so I thought. But the pattern of flashing lights when I started was not the pre heater, but an error code. The cold start system was not connected. It is now. Our engines don't have glow plugs. Instead there is a single preheater that heats up some diesel fuel and squirts it into the air inlet. It works below zero. The unit does so diagnostic tests and flashes the pre heat light to show the outcome. Normally the light goes on for a couple of seconds and then off. The electronic manual on Ivecodaily4x4@groups.io posted by Hugo has an invaluable diagnostic guide. There is a module behind the fuse box that takes the signals in and send power to the preheater. In my case the main power cable was missing. Also the crucial temperature sensor was faulty. A new one solved the problem. No error codes now. Iveco Daily Genuine Iveco Coolant Temperature Sensor Part No.4857248 5010293265 £18 from V...

Ivecodaily4x4@groups.io

We have a new forum. Yahoo inexplicably closed down all their groups. Unbelievable. For a small fee we did a transfer to groups.io. All in place and looking good. Many thanks to Hugo for leading us and many other users for contributing. https://groups.io/g/Ivecodaily4x4

Steering rack removal and refurbish part I

Image
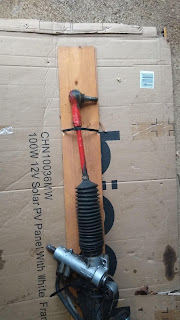
This was never really in the plan. Yes it did have a small fluid leak wetting the inside of the gaiters, and some discoloration of the steering fluid. But nothing serious. However the engine mount project required the rack to be dropped (the ball joints stayed in place.) So it seemed an opportune time to remove it and send for refurbishment. I used in Steering Specialists Wakefield   because they had done a good job with a picanto caliper, and they were really easy to communicate with. No regrets. Collection and return of the rack was so easy. I strapped it to a plank of wood and put it into a cardboard box. They removed all extra bits liek ball joints and returned them loose.  ACS in Walsall  have been used by other Iveco people and get good reports. I found it very difficult t install. I tried repeatedly with the steel ppes attached because they are so hard to reach once installed. But eventually i gave in and put the rack in first and used a short spaner to conect the ...

Reversing camera without LEDS

Image
Like many people I bought the reversing cameras off eBay in a unit with camera surrounded by infra red LEDS. The design is useless. At night the LEDs come on and completely white out the camera. Teh units work better without the lights, just elying on streetlights and car headlights for illumination. So I openned one up and disconnected the LEDs. So 90%  of the unit is wasted space !